As Seen On HGTV!
Thank you for your interest in my potting shed. I hope you find the information here helpful — and, as always, happy gardening!

The Location:
Using the parameters set out by our local municipality, we placed the shed in a corner of the backyard, a corner that had full access to southern exposure — an essential element during the winter months when young seedlings need light.

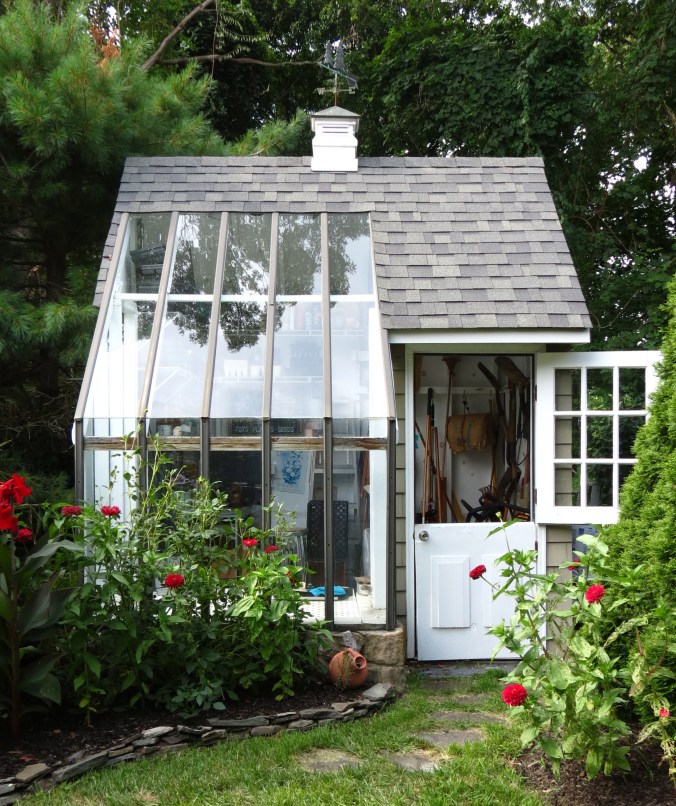
The Floor Plan:
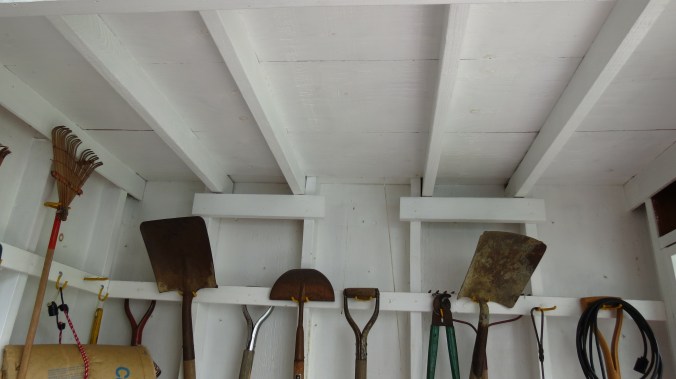
The shed roughly measures 10’ x 10’. As you open the door, you are standing in the shed area, where there is room for the lawn mower and an assortment of yard tools hanging on the walls. Above this area is the loft, where we store pool supplies and terra cotta pots over the winter.
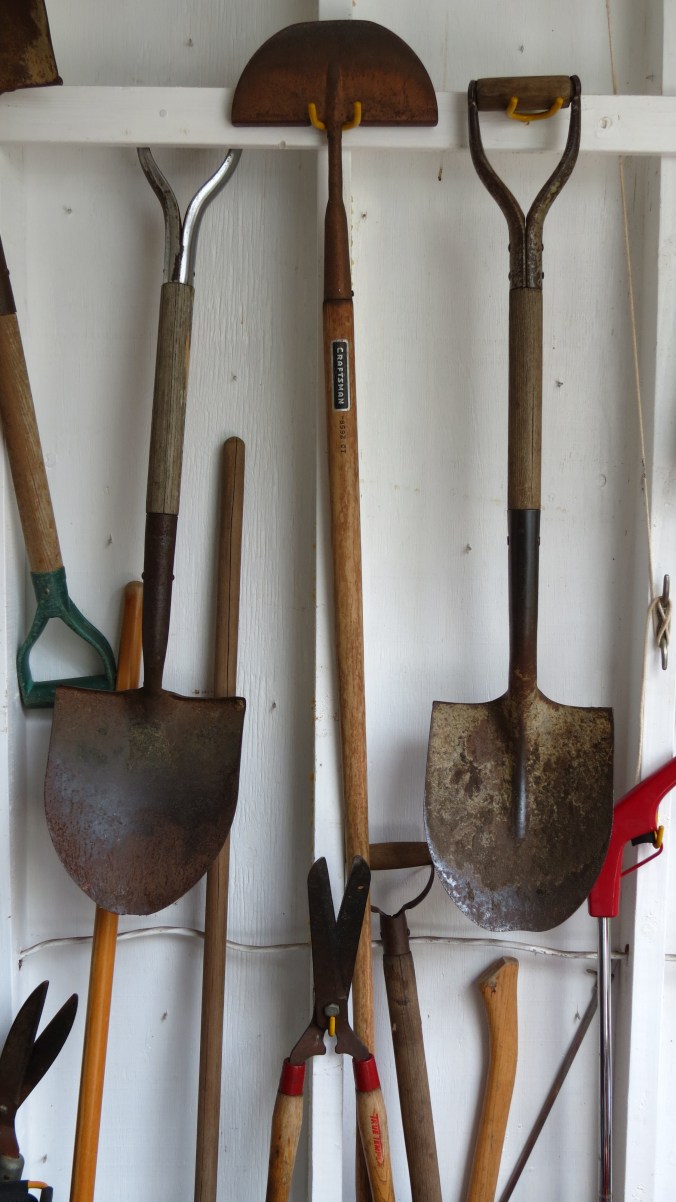
The shed side.
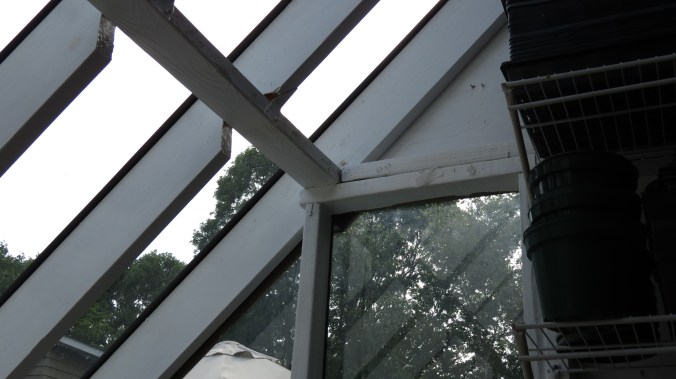
To the left is the potting area. This area is partly under a covered roof (the north side) and glass (the south side). In this area, you will find my potting bench and shelves filled with plastic pots and trays for seed starting.
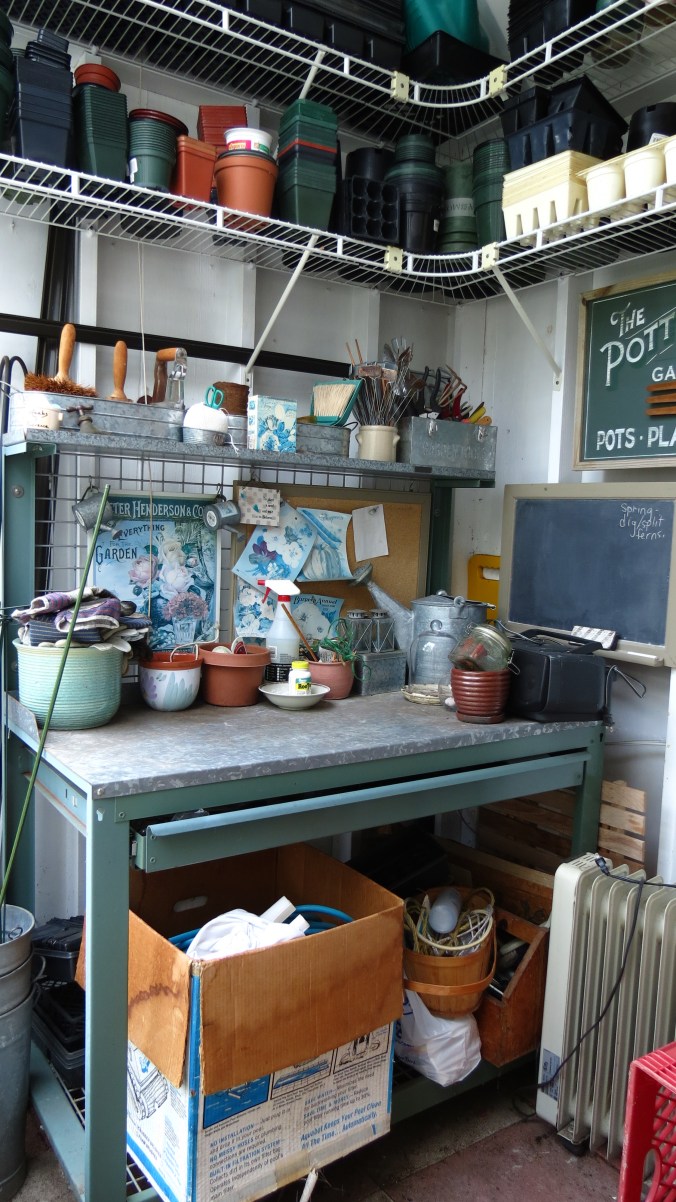
The potting side.
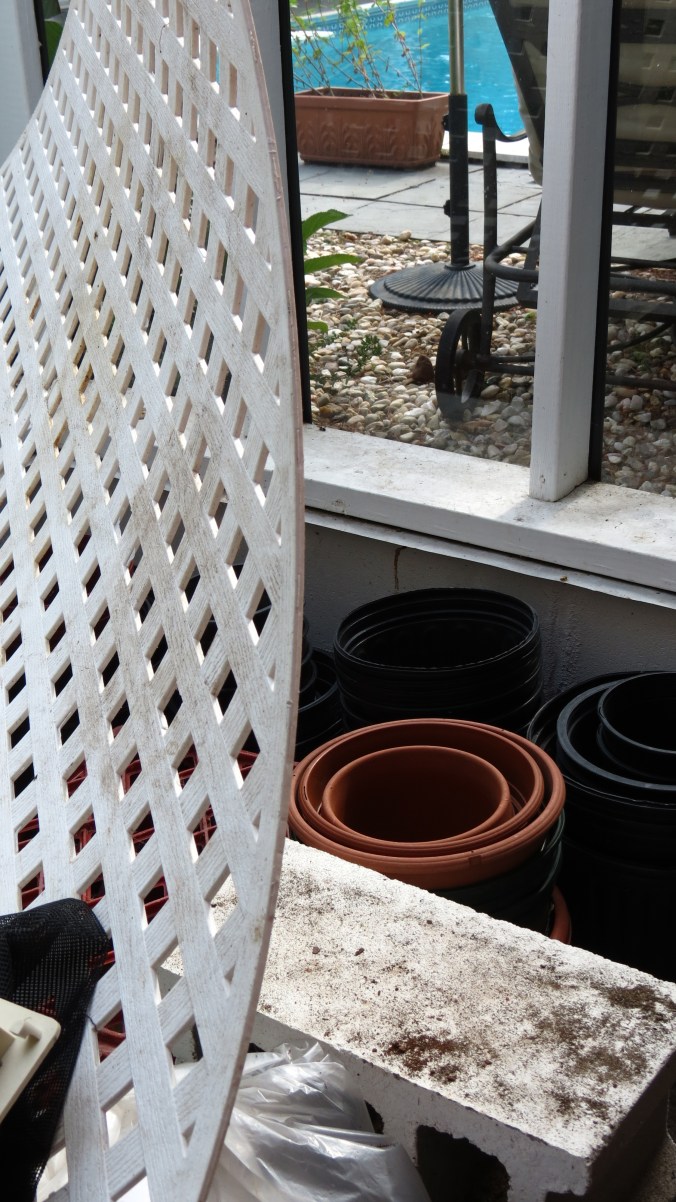
This area is also where the front of the shed bumps out, an area that is completely under glass. A piece of white lattice acts as a low table for holding flats of seedlings. Beneath this lattice is a bed of rocks, which helps with drainage after watering the new plants.
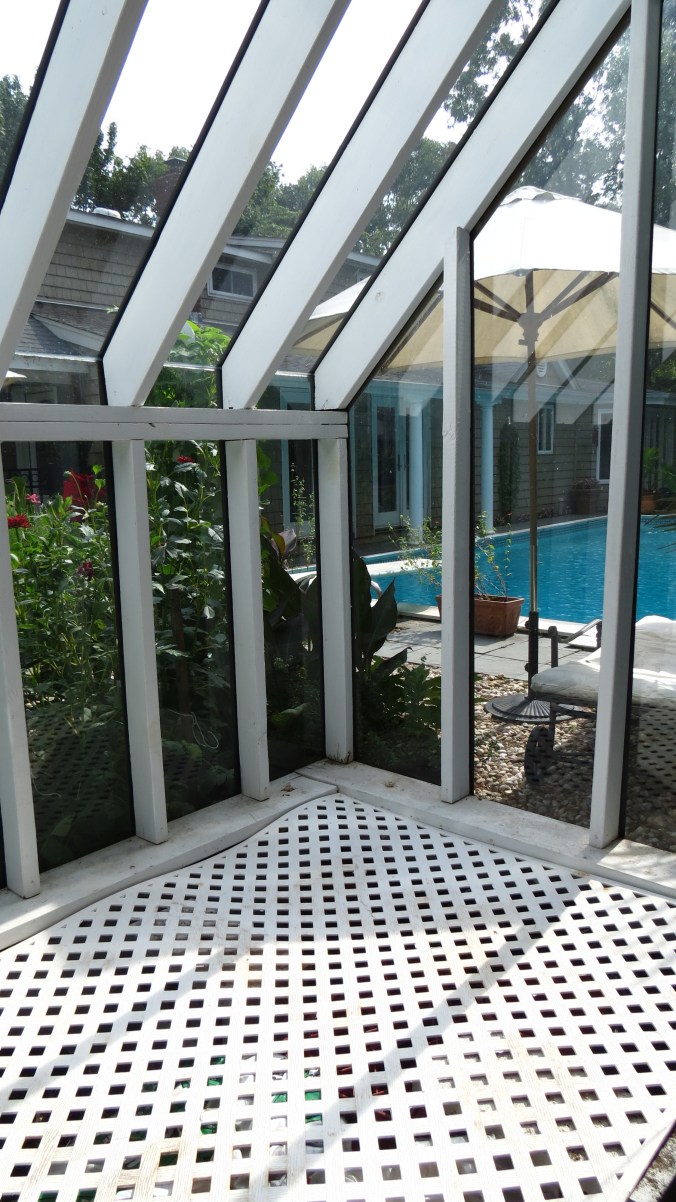
This is the seed starting area. Beginning in February, heat mats are placed on the lattice so seeds can receive bottom heat. Beneath the lattice is a floor of rocks and stones for drainage purposes.
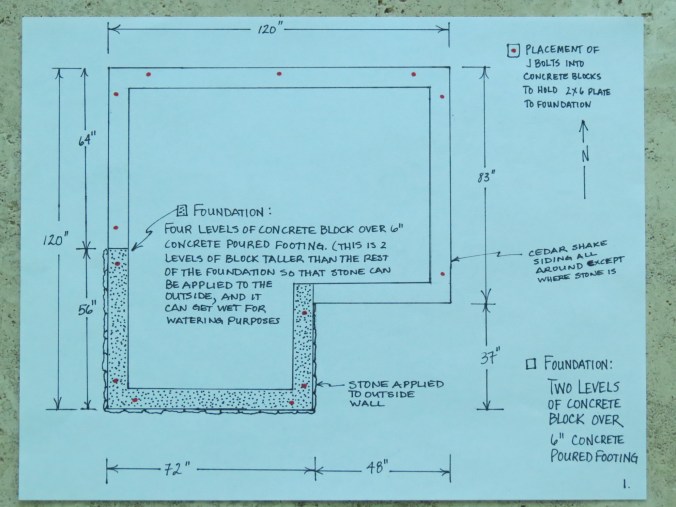
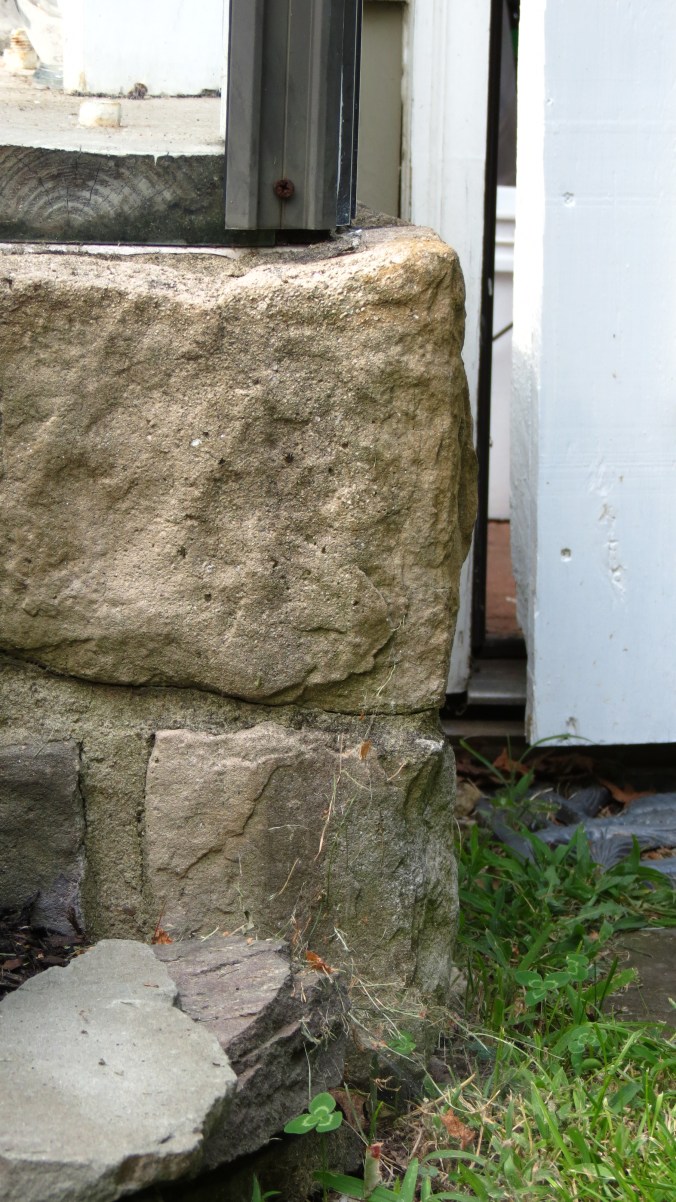
The Foundation:
The foundation has a poured concrete fitting and two courses of 8” x 16” cement blocks. The floor is simple cement patio blocks, which were recycled from our old patio. The bumped out area in the front is four courses high of cement blocks, which were then covered with decorative fieldstone.
The Construction:
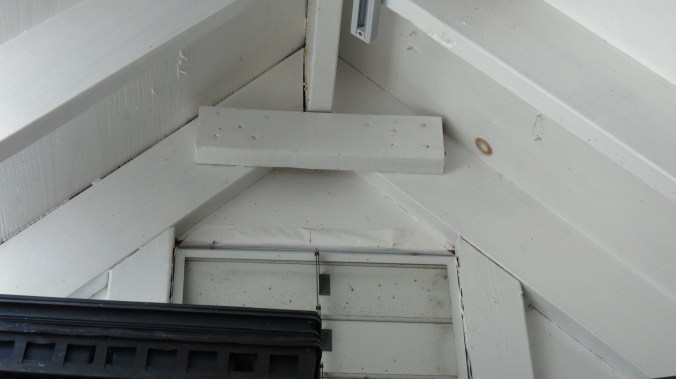
It’s all-wood construction, using 2” x 4”, 2” x 6”, and 2” x 8” lumber. The exterior walls, roof, and loft floor are constructed of plywood sheets. The roof is covered with decorative shingles and then topped with a cupola.
There are many materials for the actual greenhouse area, such as Plexiglass and Lexan, both of which can help diffuse sunlight. We chose shatterproof glass, purchased from a local glazier, for aesthetic reasons. The tracks that hold the glass were purchased through a greenhouse supply catalog (see resources).
The interior was painted white to help reflect sunlight.


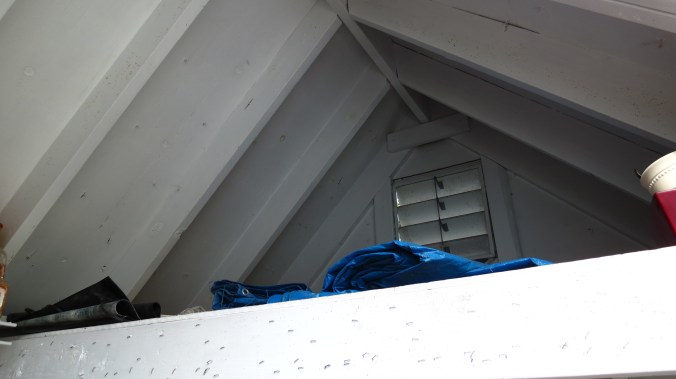
The rafters that support the loft floor.
Additional Photos:
The area under the lattice table is also ideal for storage.
Electricity:
This was essential since there are so many items in the shed that require power. The heat mats (since seeds require bottom heat before they require sunlight), the space heater (necessary for cold winter nights), lighting (for evening visits to check on the little ones), and the radio (for music). While we wired the shed, we also had some outlets added to the shed’s exterior for electric yard tools.
Water:
We chose not to have running water in the shed, mostly because it required having a pipe travel a distance from the house to the shed — and in an area where the ground freezes, it just didn’t make sense. Besides, carrying jugs of water is a nice workout.
Humidity:
Humidity has always been the biggest issue for me. Although there are electric humidifiers available, I decided to make good use of what I had. I have found that a tray of water on the heat mats, as well as spilled water on the cement block floor, can create enough humidity — maybe not optimal, but enough.
Ventilation:
There are electric vents that can open automatically, but I chose the manual kind. No reason — it was easier.

Preparing For Planting:
I usually start seeds in February, which is based on the last frost date in my Zone (6). Before I start any seeds, I have to help the shed retain heat. To do this, I hang plastic sheets to separate the shed side from the potting side. In addition, a plastic sheet is hung to create a false ceiling so that heat does not escape through the loft area.
Essential Tools:
Some items, I have learned, are essential for successful seed starting in the shed.
- A thermometer to help measure both maximum and minimum temperatures, as well as humidity.
- Heat mats to provide heat for newly planted seeds.
- A thermostat/timer for the heat mats to help regulate the bottom heat.
- A timer for the space heater to help regulate heat.
Additional Resources:
Greenhouse Gardener’s Companion by Shane Smith
Greenhouses for Homeowners and Gardeners by John W. Bartok. Jr.

Pingback: The House That Joe Built | Nitty Gritty Dirt Man
I want one of these!! Fab shed and blog , informative and entertaining . I have been looking everywhere for an aesthetically working shed /greenhouse combination and my search has taken me across the pond to an exceptional blog . ….and shed envy !
Hi Elin and welcome. I’m so glad you found my blog and a potting shed that suits your needs. Feel free to print out the plans!
Hi Kevin I also have the need to grow…I put a 12×20 foot green house attached to a 14×24 foot shed…the Greenhouse has doubled pane glass for added thermal retention..with automatic roof ridge vent and automatic exhaust vent..I also have a fan just to keep air moving..I have 2 55 gallons black water barrels to hold water one of which I have..a water pump with a hose attached which I recirculate the water I use this barrel to water and fertilize..after watering I refill…it’s alot of work..I have had problems with aphids on my tropical hibiscus so I just released 3000 ladybug..and in the winter I look for praying mantis. Eggs on bushes and cut them and they hatch in the spring ..wish I could send pics
Hello — that sounds like an amazing effort. I love the idea of ladybugs for pest control!
This is so wonderful..We are going to give it a try..Thanks for sharing!!
Hi Lynda. Hope it all works out for you!
Hope you don’t mind, but, I Pinned your greenhouse/potting shed on Pinterest. Just love it.
Hi Rhonda. Mind? I’m deeply flattered. 🙂
Pingback: It’s Spring … Lets Celebrate in the Garden
Hi Bren. Thank you!
Where do you get the glass and how much for the project? Lookin GREAT!
Hi Fred. I purchased the glass from a local glazier. In fact, he suggested glass that would simply shatter into small pieces should a branch hit it. The total cost — and this is going back more than a few years — was approximately $4,000. To keep costs down, we did the labor ourselves. I also opted to not have running water, thinking that I could carry in whatever water I needed. It was more important, for me, to have electricity for lighting and heat. Hope this helps — and best of luck with it.
Wonderful shed! I also pinned your idea. I think the greenhouse side would make a great little atrium for a tiny house!
Hi Nan. I am so glad you liked the shed. The greenhouse side is my favorite place to be in the winter — it’s very therapeutic to plant seeds on that side while snow is falling on the other side of the glass. Thanks for commenting! Be well.
So kind of you to share this information. I want to move into one now! Can’t wait to show my husband this awesome structure, I am visualising his hands over his head whilst writing this comment, he he!!
Hi Eleri. I’m so glad you liked the shed and that you’ll be planting that seed of an idea in your husband. Happy I could help! 🙂
What an amazing project! Super impressed!
Hi Angel. Thank you for your kind words. 🙂
Pingback: Amazing Potting Shed Inspirations - flagsonastickblog.com
Thank you.
What a lovely potting shed. Pretty place to spend some time.
Especially on a cold, snowy winter day. 🙂
Love your potting shed and the photos and the plans, looks like something I will have to show my husband…the area we live in is perfect for a building like this…thanks so much for sharing, I am bookmarking your blog and will be back to read more.
Hi Abby. Thanks for your kind words. When you have your potting shed, I hope you’ll get as much enjoyment out of it as I did in mine. Be well!
Hi Kevin,
I happened onto your site after someone pinned one of my inspirational greenhouse pins! I went to her board and found your well designed greenhouse/shed! I’ve been collecting photos and info for about a year and a half and am about ready to begin prepping the site.
I haven’t completely decided whether to use a kit or follow your lead. I will certainly check out your resources. Your iguana stories are hilarious, yet frustrating. I feel your pain… We have Texas squirrels, bunnies, deer, raccoons and the like? I too find it hard to give up on struggling plants. I have become known as the plant rescuer in my hood. 😳
We moved to our property fall of 2013 and have had our list of projects and now the greenhouse has made it to the top! I thank your partner for taking your plan from napkin to full fledged plans, all for the want of us pinners out there.
Visit me in blog land if you like, http:organizethings.blogspot.com
I don’t post real often, just when I have time or the mood strikes. I think we have a lot in common.
Hugs, Shirley
Hi Shirley. Thanks for stopping by. Best of luck with the potting shed, no matter which style you use. Like I’ve always said, mine worked for me — and my partner designed it so that it matched the house. I’ll be sure to drop by your site to check things out. 🙂 Be well!
Pingback: Cabin envy: garden shed | seafieldview
Thanks for the link! 🙂
Pingback: I’m Loving… | The Dreamery
Thanks for the link!
Pingback: How I would Deck Out a She-Shed |
Thanks for the link!
Amazing plan! Like everything about this shed!!!
Many thanks, Teresa! Hope all is well!
What size barcaps for the greenhouse did you use?
Hi Adrian. When you say “barcaps,” I assume you mean the tracks that held the glass panes. Each strip measures 2″ across. Hope this helps with your project.
Kevin,
Love your Garden Shed and I’m hoping to build my own version.
I’m trying to locate the tracks you used to hold the glass in place. Did you order the 2″ tracks from Farmtek? I had emailed them to see if the standard box tracks that I found on their web site could be used for glass and they stated that they could not so I’m wondering if I have the wrong supplier. I live in Central Texas so it would be great if I could find the tracks more locally to save on shipping cost but I’m not certain what exactly you used.
Hi Beth. So glad you liked the shed and are building your own. I feel I owe you an apology because you have uncovered a missing resource for me: the vendor where I purchased the aluminum capping system for the panes of glass. I’ve added Charley’s Greenhouse & Garden to the list of resources. Here, though, is a direct link to the capping system I used: http://www.charleysgreenhouse.com/index.cfm?page=_a2&sr=25&cid1=193&cid2=316
Thank you so much for the link and for sharing all your knowledge with us.
Hi Beth. I’m glad I could help. When I started this blog, my plan was to create something that I would enjoy — a kind-of magazine where I could write and edit and take photos, and where others could be entertained, laugh and — maybe — learn. So many people are intimidated by gardening, but I think it’s one of those things — no matter the scale — that can bring peace and patience to a person’s life. Have fun building!
Do you have a list of materials
thank you
Hello. Thanks for your interest in the shed. Unfortunately, I do not have a list of materials in terms of how much of each item was purchased. It was plywood and studs, nails, screws, glass, tracks, faux stone for the outside base, some wood shingles around the door, vinyl siding on the other three sides to match the house, and roof shingles. I think if you know the size of the shed you’d like, you can make your measurements and come up with an amount of items, or speak to someone at a lumber store who may be able to guide you. Hope this helps a bit. Be well!
Started the shed 2 weeks ago. All wood floor and foundation on blocks. It’s the getting the roof done right that I am thinking about now… Any hints… Thanks from rainy Victoria BC Canada…
Hi Dave. Good work on the shed. It sounds like it will be lovely. I’m not sure what hints I can offer, but make sure that it’s water-tight. My shed roof is simply 3/4″ plywood covered in tar paper and then covered in regular home architectural roofing shingles. Hope this helps.
amazing shed. who’d have thought a shed would make me so excited! It’s exactly what I want: a shed that fits a lawnmower, garden implements, doubles as a potting shed AND looks amazing to replace the now rotten but pretty play house. Thank you for the inspiration. all I need now is someone to do it for me
Hi Jo. So glad you liked the shed. It certainly served its purpose for me — and hope there will soon be one in your future. 🙂
Any idea where you got the Potting shed sign?
We have the same sign that is long faded and love it but can no longer find it.
Hi Keith. I found it in a catalog — but it was so long ago. Maybe Smith & Hawkins? I’m sorry, but I really have no idea.
Pingback: The Most Charming Potting Sheds, Greenhouses & Garden Escapes – Le Sud Sucré
Thank you. 🙂
Hi there! Found your greenhouse/shed on Pinterest and it’s AWESOME. Wondering if you made the door or bought it? (And if you made it, any info about how would be helpful). Thanks for the great info and pics!
Hi Alana. So glad you like the greenhouse. I — nor my partner, Joe — can’t take credit for building the door. It’s a Dutch door, and it was a special order from our local lumberyard.
Pingback: Women Are Creating She-Sheds, A Female Alternative To Man Caves (55 Pics) | Home Design
Thank you!
Such a cool place Kevin
Thanks, Dorris!
Hi Kevin your shed + Greenhouse is the inspiration of my long held dream of a Potager in France.
I now have my house and an going to build my ‘serre/emboitement’ Bedding Greenhouse this summer.
I have a spare log burner boiler and so am going to add it to my design with under floor coils under the seedling areas.
I do not have to comply to many regs as just as long as it is wood built I can go quite large.
So I am adding a second side to the left like your one on the right.
Thank you for all the great ideas which i will put into practice
Cheers Peter
Hi Peter. I am so thrilled my little potting shed inspired you with ideas. Your plan sounds fantastic!
Hi,
I’m absolutely love this shed! I’m trying to build one as an art shed for me. All up, how much did it cost for the materials and construction of it?
Thanks
Hi Charlotte. At the time when we built it, which was about more than a decade ago, I believe it cost about $7,000. We did the labor ourselves, so that helped to keep the cost somewhat down. I’m so glad you were inspired!
I love this potting shed!!!! We have a brick building in our garden with a roof the same and I am in the process of turning it into my potting shed. We live in an old Victorian house and the look that you have created is exactly the look I’m hoping for with mine – it’s beautiful 🌻🌻.
Hi Jo. So glad you love the shed. Please, use the plans and make the design work for you. For me, I loved the look and the practicality of it — storage and seed starting. 🙂
Hi Kevin thank you for replying and saying we can use your plans – that’s great! Yes everything about your design works so well and will give me exactly what I’m looking for, thanks so much 🌻
My pleasure, Jo. When I decided to share that post with the plans, Joe and I felt it was more important to share than to worry about patents and copyrights. We just want people to enjoy gardening. 🙂
Pingback: Ultimate She-Shed Inspiration - KreativK
Thanks for the link!
Hi Kevin,
So my wife and I just celebrated our 35th wedding anniversary and I gave her a choice of a vacation get away a greenhouse or gazebo………well to my surprise she choose the greenhouse and she choose your design!
I’m in the process of drafting it to fit the area she wants it to be built. My question is, from ground to peak how high is it? Do you remember the pitch of the roof or how long the front and back rafters are?
Great Design by the way!
Tom
Hi Tom. First, happy anniversary. I’m flattered that my shed design beat a vacation! Right now, I’m sitting next to my partner — the one who designed and built it — trying to figure out the dimensions you need. It’s been some time since we built it — so, to the best of our combined memory, the height was somewhere between 10 and 11 feet. When Joe built it, he really didn’t build it with an architectural plan. The drawings on the post came after the structure was built. We also believe the roof angle is 90 degrees, but we’re unsure of the slope. I hope this gives you a little but with which to work. (I’d run outside and measure it, but the shed is in NY – and I’m now in Fort Lauderdale with Hurricane Irma.)
HI!
I LOVE this shed and am asking my dear man to help me make one!! However I do have question and its about the glass roof. We live on Long Island NY, I am originally from Canada, so there fore I am concerned with the possibility of heavy snow collapsing in the glass roof. If you have any tips or suggestions that would be great.
Thank you for making this awesome plan available!!
Erin
Hi Erin. The shed is on Long Island, where I used to live. There was never an issue with snow and glass. The heaviest snows would happen when the shed was up and running with seeds — so there was heat. The combination of that and southern-exposure sun often caused the snow on the glass to melt faster. It would usually slide off. I also used impact glass that would shatter into a million shards rather than blades. My worry was any heavy object — like a tree limb — that could blow on it during a storm. Hope this helps.
Pingback: The Potting Shed – Chez Rive Gauche
Thanks for the link.
Pingback: Springspiration: the "She Shed" - Kathryn Lemaster
Kevin,
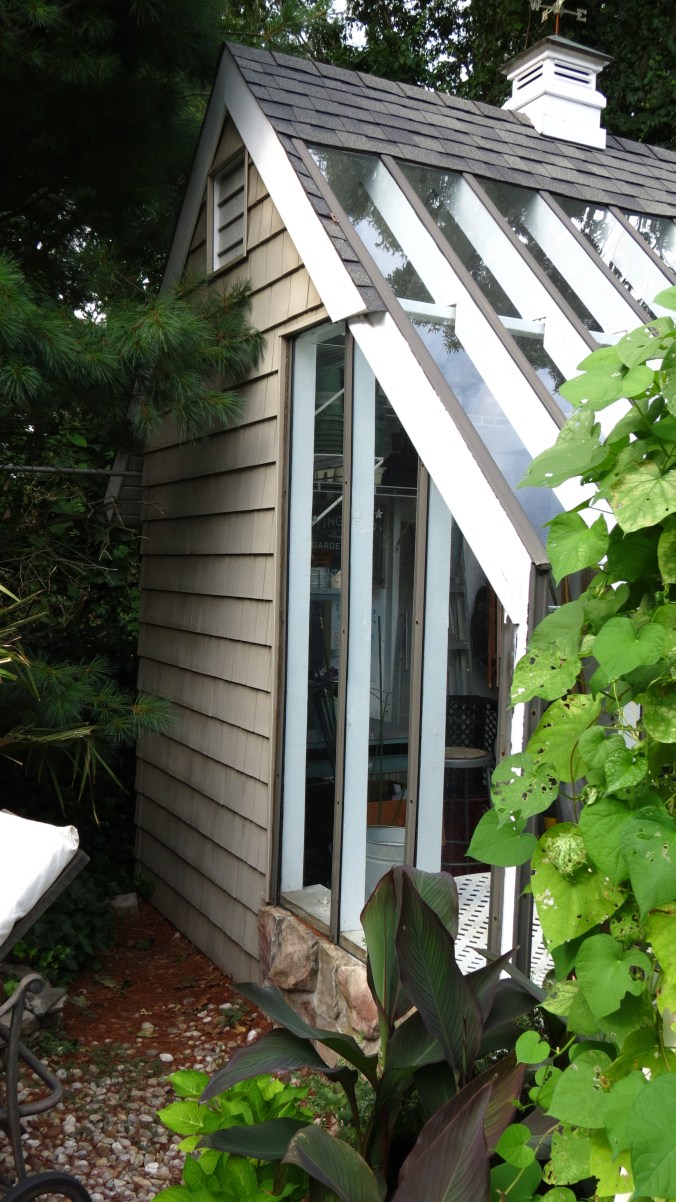
I saw your post last fall and decided to build one for my wife. I’ve figured out most of the details but don’t seem to have a handle on the left side exterior wall. Do you have a photo or can you explain how you finished the left exterior wall? Particularly to the left of the glass where the shingles start.
Also fo you a photo of the left corner by the entrance door?
Thanks for the inspiration.
Henry
Hi Henry. My apologies for the too-long delay in getting back to you. As for the left exterior wall and the left corner by the door, the glass panels were placed in metal tracks, which were attached to the exterior wall studs. Plywood sheets were attached to the remaining non-glass studs. Siding/shingles were then used to cover the plywood. I hope this answers your questions. I’ll try to find some photos and get links to you.
This post has a photo of the view left side of the shed:
https://wp.me/p1w6cN-1cv
https://wp.me/P1w6cN-1yh
Pingback: We’re Calling It: Tiny Greenhouses Are the Next Big Thing in Backyards – PushUP24
Could I see a picture of the transition from entry to raised floor? Also what type of track did you use to hold the plexy glass?
Hi Michael. Thank you for your interest in the potting shed. There isn’t a raised floor in the shed. The shed has a dirt floor, on which I placed patio pavers. The floor beneath the glass bump-out at the front of the shed was also dirt, but was covered with pebbles. This allowed for easy drainage when I watered the plants sprouting in that work area. As for the track I used, I searched for the paperwork — but no luck. My best advice is to visit a local glazier and explain what you’re looking to do. He should be able to suggest a product that would work in your area. I draw the product and email that to you. Best.
Hi, Kevin. I’m writing an article for TheSpruce.com about outfitting garden sheds and I would love to use the 9th photo down as an example. I would, of course, give you credit and a link back. Please let me know if that would be okay with you. Thanks.
Hi Marie. I’m flattered that you’d like to feature my shed in your article — and yes, you have my permission. I appreciate the links back. Please, let me know when your post is up. Be well!
Pingback: Man-Caves and She-Sheds: The Ultimate Guide to Getting Your Personal Space - PA Property Services
Do you sell that garden sign?
Hi Barbara — I wish I did! I actually found that sign in a garden catalog years ago — and I’ve never seen it again.
Pingback: 30 Absolutely Enchanting Garden Shed Hideaways – US
Hi. Found your plans for the shed. I super loved them. I have scaled them down and modified a bit for 1:12 scale garden shed. I’d love to share the photos of my build. Basic shape esthetic is yours.
I’m about 3/4 of the way complete. Let me know if you want to see your shed in miniature. :). Great structure. I loved the bones of what you built.
Mine is in foam board, popsicle sticks, balsa and lots of cardboard and glue! ☺️
It was lovely “chatting” with you the other day. I look forward to seeing the progress. Thank you! 🙂
Pingback: 17 Unique Backyard Potting Sheds To Inspire Your 2020 Garden Life
Pingback: Swoon Worthy Greenhouse Designs to DIY or Buy - Twelve On Main
Pingback: As Seen On WordPress & HGTV | Nitty Gritty Dirt Man
This concept is exactly what I have envisioned for so long for my photography studio!! I have an existing shed on my property and plan on using bits and pieces of your plans to do have greenhouse/studio. The greenhouse portion is mainly for photos but I do have a green thumb and love my plants so who knows where it will lead me!! Thanks so much for sharing this.
Hi Daniela. I’m so glad you found the potting shed and that it’s sparked your imagination. That’s exactly why I shared the plans in the first place and it’s been remarkable to see how people have adapted it to their own uses/style — from full-size sheds to clay models. I wish all the best with it — and I’d love to see the finished product!
Hi Kevin,
Thank you for your amazingly generous posts! I am using many parts of your wonderful, detailed, creative shed plans to build my own greenhouse/shed. Could you explain how the flashing was applied to cover the concrete blocks? There seems to be many approaches to flashing concrete block and I’m looking for some helpful feedback from someone who has done the work. I live in Washington State on the coast and need to plan for a lot of rainfall.
Hi Christine. Thanks for stopping by and I’m thrilled that you found inspiration! The flashing was applied with PL-400, which, at the time we built it, was a construction adhesive. Now, there are many PL products that are more specific. Look for a concrete-to-metal adhesive. It may have a different PL number, but as long as it adheres metal to concrete, you should be in good shape. Good luck with the build!
Pingback: 50 Small Shed Plans (Free Plans Available)  - Home Inspection Insider
Is there a place to download more detailed plans? I may be missing it, new to building and trying to figure out if this is practical.
Hi Jay. I’m afraid these are the only plans we have. They were hand-drawn by my husband and these are the ones we used when we were designing and building the potting shed.
Pingback: 30 Absolutely Enchanting Garden Shed Hideaways – Best Animal
Pingback: 30 Absolutely Enchanting Garden Shed Hideaways – Animal Zone